SpringBoot-Maven打包Jsp
事情的起因是需要将宝宝旧的毕设项目重新跑起来,而旧的是使用原生Servlet+Tomcat的方式运行起来,而且我新的电脑上没有安装Tomcat,就算弄好交给宝宝跑起来还是要装环境很麻烦,所以打算使用springboot将项目重新写一遍,这样交给宝宝就可以直接执行main方法或者使用命令java -jar xxx.jar的方式直接执行即可。
然后呢,问题来了,Spring原生不支持Jsp,而项目里一些页面需要用到jsp的一些特性,所以进过查资料结合尝试整理出下面的内容,以供后用,是可以直接将项目代码打包成可执行jar包的方式。
01 添加pom依赖
在pom.xml文件中必要的依赖项
        <!-- 添加servlet依赖模块 -->
        <dependency>
            <groupId>javax.servlet</groupId>
            <artifactId>javax.servlet-api</artifactId>
        </dependency>
        <!-- 添加jstl标签库依赖模块 -->
        <dependency>
            <groupId>javax.servlet</groupId>
            <artifactId>jstl</artifactId>
        </dependency>
        <!--添加tomcat依赖模块.-->
        <dependency>
            <groupId>org.springframework.boot</groupId>
            <artifactId>spring-boot-starter-tomcat</artifactId>
        </dependency>
        <!-- 使用jsp引擎,springboot内置tomcat没有此依赖 -->
        <dependency>
            <groupId>org.apache.tomcat.embed</groupId>
            <artifactId>tomcat-embed-jasper</artifactId>
        </dependency>
02 新建webapp目录
在src目录下新建webapp\目录,如图所示:
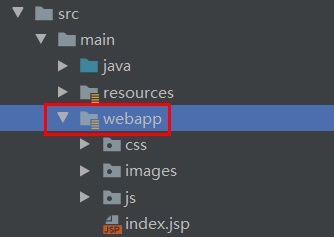
如果将前端代码放到resources\目录下,实际上是检测不到的。
03 添加配置信息
在springboot的配置文件中添加如下配置:
# webapp根目录
spring.mvc.view.prefix=/
# 文件结尾的后缀
spring.mvc.view.suffix=.jsp
第一个使用斜线表示前端文件放在webapp的根目录下。(这不是一个好习惯,请不要模仿哦~)
第二个配置信息表示检测.jsp文件,Servlet也支持其他模板引擎,如.vm等,也可以在此处配置。
04 代码中使用
填好配置信息后就可以直接在代码中使用了,例如:
@RequestMapping(value = {"/hello"}, method = RequestMethod.GET)
public String hello(HttpServletRequest request, HttpServletResponse response){
    System.out.println("to hello page~");
    return "hello";
}
这样就可以启动springboot项目,通过访问localhost:8080/hello访问到该jsp页面了,此处需要注意不能添加@ResponseBody注解,实际项目中也不要使用System.out.println();打印日志。
那么问题来了,上面的依赖、配置等ok了以后,在开发期间可以正常测试运行,那需要打包部署的时候怎么办呢?
05 增加pom打包配置
除了新建springboot项目时,自动添加的springboot打包配置以外,还需要额外补充一些将webapp\目录下内容添加到jar包中的配置,完整的<build>部分如下所示:
<build>
    <plugins>
        <plugin>
            <groupId>org.springframework.boot</groupId>
            <artifactId>spring-boot-maven-plugin</artifactId>
            <version>1.4.2.RELEASE</version>
        </plugin>
    </plugins>
    <resources>
        <resource>
            <directory>${basedir}/src/main/webapp</directory>
            <targetPath>META-INF/resources</targetPath>
            <includes>
                <include>**/**</include>
            </includes>
        </resource>
        <resource>
            <directory>src/main/resources</directory>
            <filtering>false</filtering>
            <includes>
                <include>**/**</include>
            </includes>
        </resource>
    </resources>
</build>
执行mvn package即可看到在target\目录下生成好的jar包。
此处需要注意的是,spring-boot-maven-plugin的版本填写1.4.2.RELEASE即可。下面配置就是将webapp\下的文件添加到jar包中的META-INF/resources目录下,如图所示:

06 执行
在命令行执行java -jar xxx.jar即可看到SpringBoot项目正常启动,Jsp页面也可以正常访问到。
有了上面的一系列配置,不管是手动打包执行,还是使用Jenkins等CI工具,都可以正常使用~